

How to mike a Violin
Article by Gregor Zielinsky. Read more on Gregor’s profile page.
This article describes how to mike violins in special loud situations, as well as in normal, common situations.
We will describe, how microphones from the company REMIC MICROPHONES, will help to solve situations in a way, which is unique until today.
- How to mike a violin
- The sound of the violin
- Types of microphones
- How to mike violins in common studio recordings
- How to mike violins for live performance
- Special situations in the studio
- How to set up a wireless mike on a violin
How to mike a Violin in different Situations
Miking a violin or viola can be a very challenging task. Especially when it comes to certain situations like:
- Concerts
- Amplification
- Playing together with some loud “competitors”, like a rock band
- Open air concerts
- Special sound ideas
- Film scoring
- Object based recordings or others
All the above situations differ from the “classical – classical” recording. By “classical-classical” recording we mean recording a solo string instrument, a string quartet or an orchestra for the purpose of a “normal” classical recording, of a “normal” classical piece of music, with a normal microphone setup, using instrument miking spot mikes. By classical piece of music, we mean from composers such as Beethoven, Mozart, Schönberg, or any of those well-known or not so known old or new composers.
The task that we want to have a special focus on here is: Picking up the sound of a violin in situations, where you need to have the instruments loud and separated from other instruments. Using a special pickup microphone for classical instruments is not really new. Usually this is called close miking. However, frankly said, we are pretty much aware, that the results of these common attempts are quite often not very convincing. Either the sound of the violin sounds very unnatural – or you just cannot hear the violins, when the musicians (acoustic string players) are working against the rock band.
The Sound of the Violin
In order to find out how to close mike a violin, while keeping its specific sound, let us have a look, how the sound of the violin is actually created.
As we all know, the violin is a string instrument, played with a bow. Therefore, the natural sound can be defined by the attack and transient response, when the player is starting to play a note. This first phase is the most important for any kind of sound. It defines how human ears detect and understand any sound. Which can be a musical sound, spoken word, or any other sound. As an example, take the letters “d” and “t” They sound pretty much the same. However, that attack phase of the “d” is softer and longer, than the transient of the “t”. This gives us the chance, to differ, whether we hear the word “do” or “to”.
After the decay phase, the next important part is the sustain part, which is also called “quasi stationary phase”. During this phase the sound has stabilized, and the complete spectrum of the violin will develop.
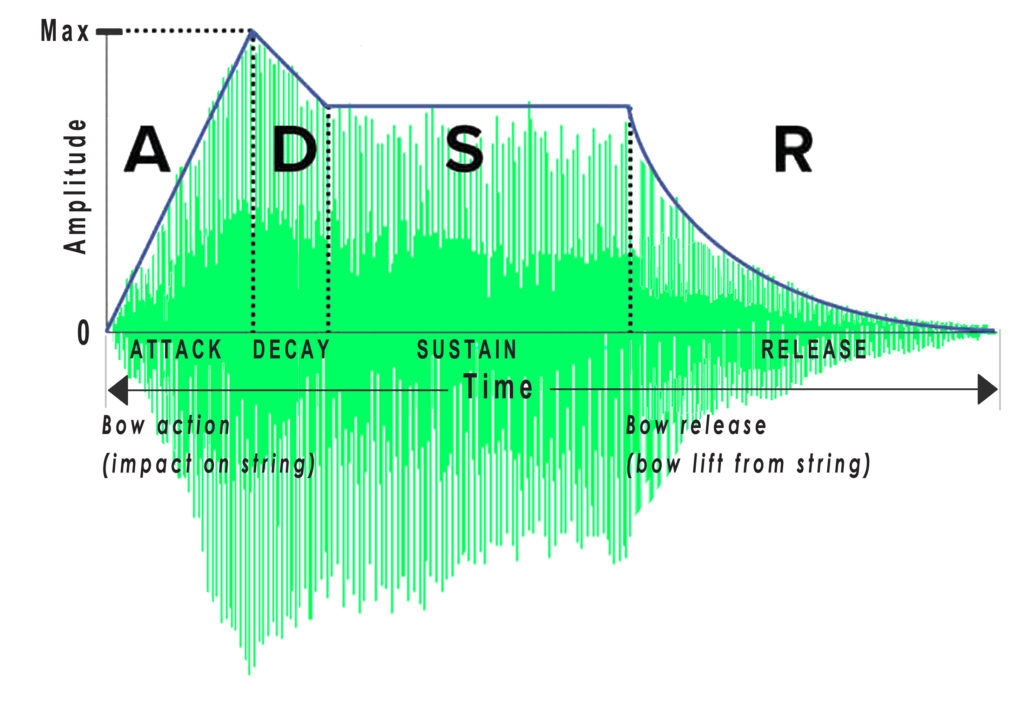
Image above: This drawing represents the level envelope of a violin sound over its entire development from the start to the end after releasing the bow.
The next important aspect of the violin sound is the resonance, also called formant. The resonance can be heard and measured during the so called “quasi stationary” phase of the sound. This is usually reached after the attack phase of the note.
Besides the actual musical sound of the string, the violin has some noise artefacts, which are caused by the bow moving over the string. These artefacts belong to the sound of the violin. However, when they are picked up too emphasized, they will usually be regarded as disturbing.
Last, but not least, the polar pattern of the instrument is important. This is especially relevant if you use a common microphone, where the mike is placed in a little distance to the violin. The polar patterns describe, which frequency range is projected in which direction of the instrument.
Attack Phase of the Violin
The attack response of the violin has an average length of 10-100 milliseconds. It contains all overtones and partials that a violin can produce. Also, it may contain a lot of noise artefacts.
This can be changed by the artist, and is of course a very important way, to form the sound. It has an enormous influence of the artistic expression which the musician wants to give to his interpretation.
Of course, this can also be played in a very soft way, so that especially the noise artefacts will be suppressed, mainly in piano dynamics. There are many different ways of playing the violin. Like coll´ arco, col legno or pizzicato. These different styles produce very different transients, spectra, and stationary states.
Formants
The violin has several areas of formants.
Formants are resonances, which are independent of the pitch the instrument is playing. This is true for vowels as well. For example: If you sing with the letter “UUU”, no matter, what note you sing, it will always resonate with a frequency of 300 Hz.
Below graph presents the basic and most important formants, that you find in the human voice and in most, tuned instruments. The vowels above the ranges of the formants that you see here, refer to the German pronunciation.
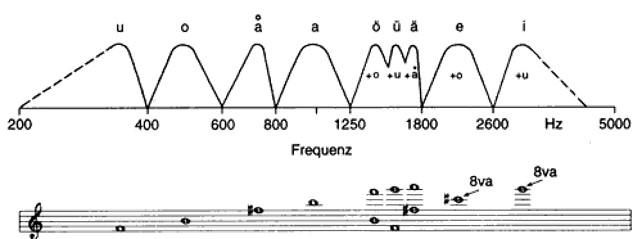
Courtesy of PPV Verlag: Dr. Jürgen Meyer: Acoustics and the Performance of Music
Formants or resonances of the violin:
- A formant around 400 Hz, which is usually very strong when playing the G-String. This gives it the dark sounding “ooh” kind of sound.
- In higher regions we will have a resonance around 1KHz. This may vary a little bit, depending on the manufacturer of the instrument. Guarneri violins are a little bit above 1 KHz, while Stradivaris are a little bit lower.
- Furthermore, there are formants around 2 KHz and 3 KHz. This may also vary, depending on what kind of violin it is.
Polar Patterns
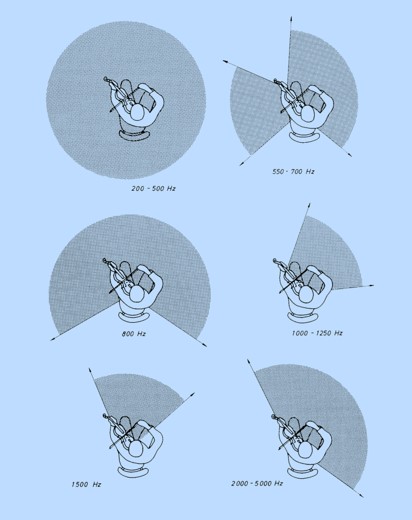
Courtesy of PPV Verlag: Dr. Jürgen Meyer: Acoustics and the Performance of Music
The above graphics show, how and where the sound of the violin is projected. It basically explains that the relevant parts of the string sound are mainly projected to the front. However, there are also some relevant parts, that are projected to the rear, like 200-500 Hz or 800 Hz.
Practical experiences have shown that a placement of the microphone behind the violin can produce a warmer sound with much less noise artefacts. This can be a relevant technique, in case a sound and reproduction like this is necessary. The author used this technique especially during the 80s, and early 90s, when AD converters and overall digital processing produced pretty much a kind of harsh sound.
Types of Microphones
There are many different ways of picking up and recording violins, as well as other string instruments. This is mainly depends on what kind of recording you do.
Basically, the use of condenser microphones can be suggested, as these microphones pick up sound much more detailed and precise than dynamic mikes do. Usually engineers are using cardioid patterns. In a studio situation you might also want to use patterns like wide cardioid, omni, or even figure of eight microphones. Ribbon microphones, which have a special sound, usually have a figure eight pattern.
How to Mike a Violin for Common Studio Recordings
There are many ways to capture the sound of a violin in a normal “classical – classical” recording situation. Usually, condenser microphones with a small diaphragm are used, such as microphones from Neumann, Schoeps or Sennheiser.
Mostly, cardioid versions of these microphones will deliver good results. Of course you can use patterns like omni or wide cardioid patterns as well. Some people would even use omni or figure eight patterns. Please take into consideration that using such patterns can be dangerous and should only be used in very controlled situations.
Of course the use of multi-pattern microphones is possible as well. Finally, which microphone you go for strongly depends on the recording situation as well as your taste (and what you have in your microphone locker).
The Importance of positioning the Microphone correctly when using Spot Microphones
As seen in the graphics above, positioning the microphone in front and above the instrument is the common way of capturing the sound of the violin. This will usually lead to good results. The distance for the normal recording condition should be approximately 1,5 meters or more.
If it might be necessary to avoid noise artefacts, and or if you want achieve a warmer sound, one can also move the microphone behind the string player. This might not always be possible, especially not in an orchestra situation. But it can produce a very warm, intense and attractive sound.
How to Mike a Violin for Live Performance
When it comes to situations, where you need to capture the sound of the strings very clearly and separated, we come the point, when we want to have the best result in terms of separation and feedback rejection, but with the best sound that we can achieve.
As we saw earlier, the sound of a violin is very specific. This is true for viola, cello and other acoustic string instruments as well.
Therefore, REMIC MICROPHONES has developed microphones, that adapt perfectly to the sound of each particular string instrument. In this case, we are looking at the violin and viola as well.
Basically, REMIC MICROPHONES is offering two types of the violin/viola microphone.
These are the “Studio/Live” microphone, named “REMIC V5200 Studio/Live”. And there is the Live Mic named “REMIC V5200 LB”. There is also a dedicated version for violas as well.
Additionally, there are several versions for wireless transmitters, which will be discussed later.
Both types adapt perfectly to the sound of a violin. They work great in loud environments, concert halls, or in the studio.
While the Studio/Live version has a very natural sound plus a good sound rejection, the Live version has a slightly altered, “woodish” sounding frequency range, but has an even better rejection and feedback suppression.
You can find more precise information here:
https://www.remic.dk/news/the-astonishing-art-of-sound-reproduction/
Setting up the Mics and the Anxiety of the Artist
We know very well that string players are very sensible about their instruments. Therefore, the material of the REMIC microphone is very soft, and can easily be attached by the musicians themselves. This is absolutely important for any live orchestra situation.
Furthermore, the cables of the REMICs are very soft, giving the musician a lot of trust, that it will not harm their instrument. An addition to that, it does not produce any disturbing noise, like structure-borne sound, when the cable is moving slightly above the surface of the body of the instrument.
If you are recording or amplifying in a very loud situation, it is suggested to use the Live “LB” version.
If the situation is not that difficult, and you may not have the loud rock band on the stage as well, it is suggested to use the Studio/Live version with omni directional polar pattern.
You can easily adjust the sound of the REMIC according to your taste with the help of a multiband EQ.
More info about EQ’ing can be found here:
https://www.facebook.com/groups/1274102739368320/permalink/1285817934863467/
The sound of the REMICs is direct, which can be expected. But as it regards all the specific sound characteristics, it will deliver a perfect violin and viola sound, which sounds really natural. It does pick up the noise artefacts in a perfect balance to the sound of the string itself, and will never sound harsh, or artificially “electronic”.
Finally, all REMICs are having a built-in windshield. This can be very important in outdoor situations. And it can also help to suppress the noise from a strong breathing musician.
The shield cannot be seen in any way and does not change the sound of the mike at all.
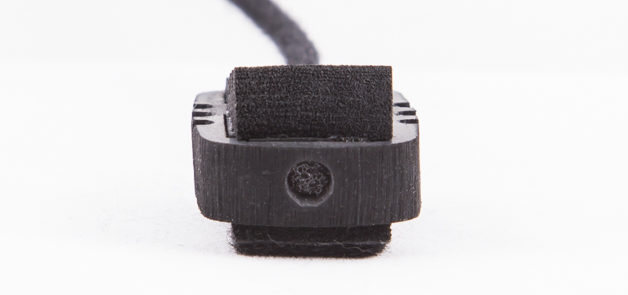
Image above: REMIC V5200 series violin microphone with built-in windshield.
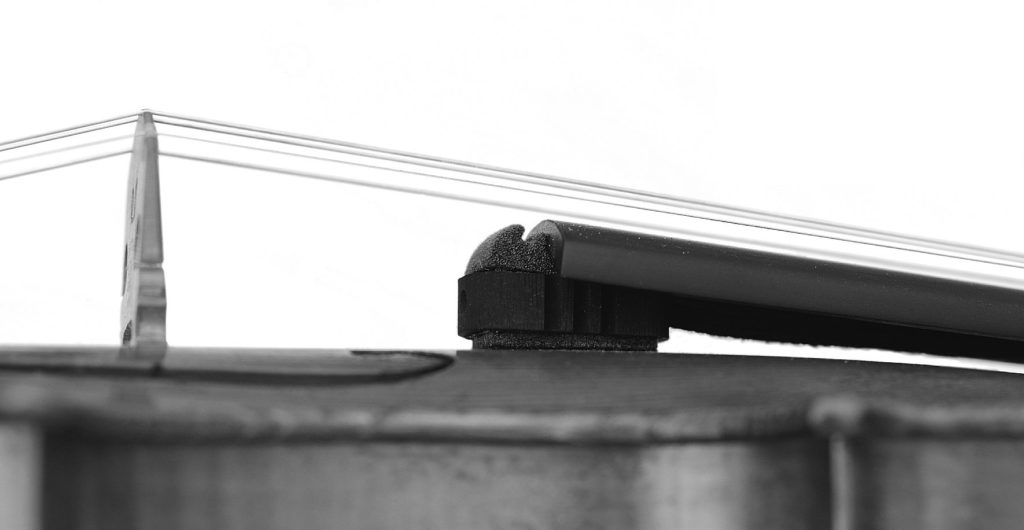
Image above: A Violin Microphone from the REMIC V5200 Series mounted under the Fingerboard of the Violin
Special Situations in the Recording Studio
As we described earlier, if you have a normal studio recording, you may want to use common microphones.
However, also in a studio situation, it might be meaningful to use the specific sound of REMIC microphones.
Of course, if you have a combination of acoustic string instruments paired with some loud instruments, and you just cannot place them in separate rooms or cannot track them, you have the same situation as in a live performance.
But also, you might want to use the specific sound of the REMICs. The directness and the sound full of character will add a special soundscape to your recording.
Using the “Live LB” versions, can produce a kind of “nostalgic” sound, producing a spectrum that might remind you of classical movies.
After all it is a matter of taste, of course! Or as some clever guy once said:
“Microphones make the best filters.”
More in-depth info can be found here:
https://www.remic.dk/news/the-art-of-close-miking/
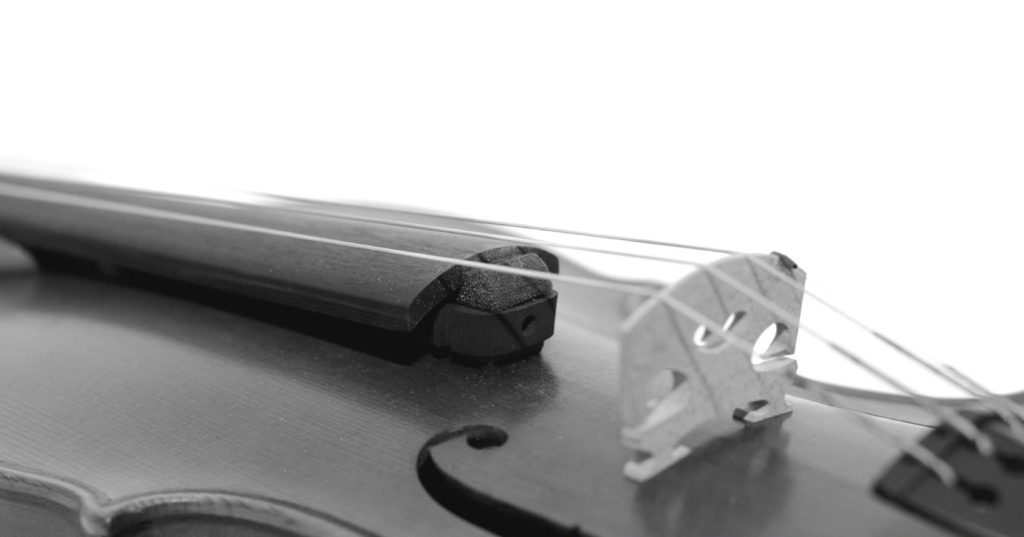
REMIC V5200 Series Violin Microphone mounted under the Fingerboard of the Violin
How to set up a Wireless Mic on a Violin
Using a wireless transmitter when performing with an acoustic string instrument, in this case a violin, usually raises the following questions:
- How safe is the connection from the cable to the transmitter?
- Can the musician set up the mic by himself and can he/she plug in the cable into the transmitter by him/herself?
(Of course, there are many more questions, concerning the whole wireless topic. But this is not so much our topic here.)
At REMIC MICROPHONES, we have especially considered those two questions. In decades of experiences we know that these are very sensible aspects.
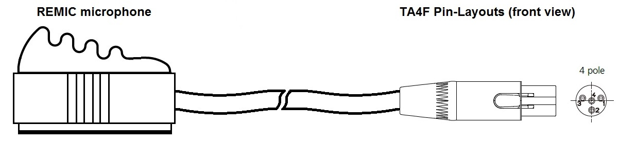
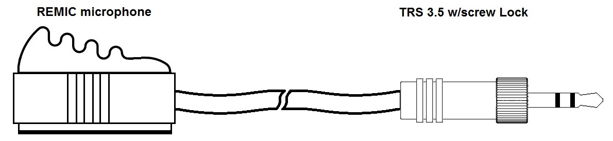
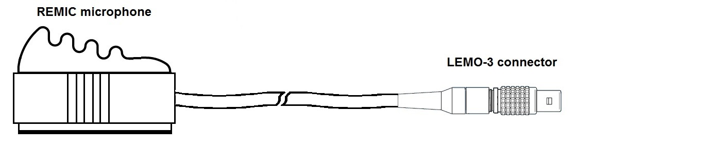
REMICs can be delivered with TA4F and Lemo connectors for Shure, and also 3.5 TRS as well as Lemo-3 connectors for Sennheiser transmitters.
There are no adapters needed, which would cause instable connections and it is very easy to plug the connector into the transmitter.
All in all, the REMICs are made for perfect sound and ease of handling especially in situations when it comes to quick and easy set-up of the microphones.
About Gregor Zielinsky
Gregor Zielinsky is a Grammy winning producer/tonmeister and expert in 3D audio. He previously held positions at the highly regarded record label Deutsche Grammophon as well as 18 years with Sennheiser as artist relationship manager. He currently consults and lectures internationally and functions as manager and producer at Tonstudio Tessmar in Hanover, Germany.
Read more on Gregor's profile page.